
What You Actually Need to Start Saddle Hunting (And What You Don't)
"A saddle, a tether, a lineman's rope, climbing sticks, and a platform. That's what gets you off the ground."
If you're just finding this, I've been documenting my switch from traditional stand hunting to saddle hunting. Part 1 covers what pushed me in that direction. Part 2 covers how I picked a setup. This one is the part I wish somebody had written for me six months ago.
What you need to start
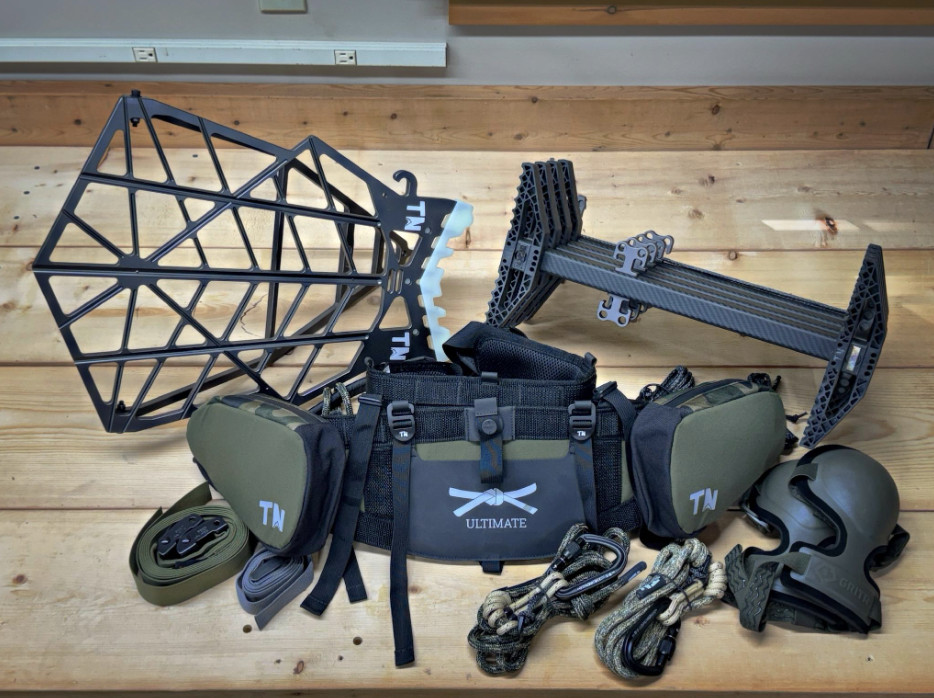
You need five pieces of gear to start saddle hunting: a saddle, a tether, a lineman's rope, climbing sticks, and a platform. After months of research, Hunt Bums senior writer Dru Yoder laid his setup out on the bench and counted. Everything past those five is comfort, convenience, or preference.
- ▸Saddle: the harness that takes all of your weight when you lean back off the tree. Dru runs the Black Belt Ultimate from Timber Ninja, 1.6 lbs, two-panel.
- ▸Tether: holds you to the tree once you're set up and hunting. 8mm Predator with sewn eyes.
- ▸Lineman's rope: holds you to the tree on the way up and on the way down, before the tether is set. Same 8mm Predator rope.
- ▸Climbing sticks: how you get up the tree. Four C2 Carbon Fiber sticks at 1.3 lbs each.
- ▸Platform: what you stand on. Kunai Hybrid, 4 lbs 10 oz, 20" x 16".
I spent months thinking this was a complicated system. Then I laid everything out on the bench and counted.
Five things.
A saddle, a tether, a lineman's rope, climbing sticks, and a platform. That's what gets you off the ground. Everything past that is comfort, convenience, or preference.

When I was researching, this is the breakdown I couldn't find. Everybody had a setup to show me. Nobody would just tell me what each piece did and why it was there. So that's what this is. It's not a review, I haven't hunted out of any of it yet. It's what each piece is, what it does, and what I figured out once it was in my hands.
1. The Saddle
The saddle is a harness. It goes around your waist with a strap around each leg, and when you lean back off the tree it takes all of your weight. You're sitting in a seat you're wearing. That's the whole job.
Mine is the Black Belt Ultimate from Timber Ninja. First thing I did out of the box was put it on with no pouches, no ropes, nothing hanging off it. I wanted to feel it on and find out if I could get comfortable in it before I started adding to it.
It's a two-panel saddle, and that's the part I didn't fully understand until I was wearing it. The lower panel is the one doing the work. It hugs your butt and thighs, and it's what takes all of your weight when you're sitting back in it. The upper panel is your back support.
Each panel adjusts on its own, and this isn't something you set once and never touch again. It took me a while to get it where I wanted it before I ever went up a tree, and I'll keep adjusting it. As you go from sitting to standing and back, you'll find you want more or less support in your back or your seat, and you'll be making those changes right through the hunt, especially on an all-day sit. Expect to adjust it again when the weather turns and you've got heavier clothes on underneath.
The saddle has three magnetic loops. Two are detachable, and those hold your climbing sticks. The third is permanently attached, and that one holds the platform while you climb.
Those loops are for the climb, not the walk in. Most guys pack their sticks and platform on a backpack to get to the tree, then move everything onto the saddle once they're standing at the base. That way it's hanging on you and reachable while you're going up, instead of sitting on your back where you can't get to it. There's a spot built into the saddle to carry your sticks the whole way in, but most guys choose a backpack.

Every saddle has a bridge. It's the short rope that runs from one side of the saddle to the other, across your front, and it's the piece your tether clips into. Everything holding you in that tree runs through it. Mine is an 8mm Predator with a prusik on one side so I can shorten or lengthen it. Bridge length changes how the saddle feels on you. Shorten it and the panel pulls tighter around your butt and thighs, so it feels narrower and puts more pressure on your hips. Lengthen it and everything opens up and loosens off. It also changes how far off the tree you hang, which comes into play when you're turning for a shot on a bigger trunk.
It's also the piece carrying your weight. Minimum breaking strength on that rope is 4,420 pounds. When you're new and standing at the base of a tree talking yourself into the first climb, a number like that helps.

2 & 3. The Two Ropes
The tether and the lineman's rope are two separate pieces doing two different jobs, but they're the same rope and they're interchangeable.
The tether is what holds you to the tree once you're set up and hunting. It goes around the trunk above you and connects to the bridge on your saddle.
The lineman's rope is what holds you to the tree on the way up and on the way down, before the tether is set. You'll see it called a lineman's belt, which is a little misleading, because it isn't a belt that goes around you. It wraps around the trunk and connects to both sides of your saddle, so you can lean back into it with both hands free while you hang sticks and set your platform.
Both are 8mm Predator with sewn eyes, same rope as the bridge.

Here's something worth knowing. Timber Ninja sends one of each color, and that's not a packaging accident. It's so you can tell them apart at a glance thirty feet up.
Pick which color is your tether and which is your lineman's rope on day one, and then never swap it. When it's cold and dark and you're reaching for a rope, you want your hand going to the right one without your brain having to stop and sort it out. Build the pattern early and it stops being something you think about.

4. A Way Up the Tree
Climbing sticks are how you get up the tree. Each one is a short section with steps on it that you attach to the trunk with a rope. Hang one, climb it, hang the next one above it, and keep going until you're at height.
Back in Part 2 I mentioned the argument between guys running a full set of sticks and guys who one stick. One sticking is where you carry a single stick and keep moving it above you as you climb. It's less to carry, but it's a lot of work done while you're hanging off the side of a tree, and it's not where a beginner should start.
I went with four C2 Carbon Fiber sticks. The first thing you notice is how light they are, 1.3 pounds each, and they're not light in a flimsy way. They feel strong. The back of each stick has teeth that bite hard into the bark, and once one is on the tree it feels solid. That goes a long way toward trusting it the first time you put your weight on it.
Each stick goes on the tree with a 1/8 full bury rope. That rope is hollow down the middle, and a bury is where the tail gets threaded back inside the rope itself. Full bury means it runs the whole length instead of just a short section, so the rope is doubled inside itself end to end. What you get out of that is a rope that's a little stiffer in your hand, holds its form, is easier to tie knots with, and has better abrasion resistance, so it lasts longer. In your hands, it feels like a rope you can trust.
The steps are wide enough for a big boot, and they have a rigid set of prongs on top that grip your sole. When it's muddy, wet, or cold, that's what keeps your foot from sliding off the step.
The sticks stack together with magnets for carrying, and those magnets are strong. New out of the box, they're strong enough that you can't just pull the sticks apart. You have to rock them back and forth a bit to get them to release. I'm sure that'll wear in some over time, and I was told a bit of felt on the magnets makes them easier to separate.
I really like how everything so far packs up into itself, and the sticks are a good example. The bury ropes wrap around the sticks, so they stay attached while the sticks are packed and stored.

5. The Platform
The platform is what you stand on. The easiest way to describe it is the platform off a hang-on stand, minus the weight and the seat. Thin it down, make it stronger, and that's pretty close.
Mine is the Kunai Hybrid. It's light, 4 pounds 10 ounces, but it's on the bigger side for real estate at 20 by 16 inches. For a beginner like me, that bigger footprint is a bit of security. There's room to move around up there.
Being light matters more than I expected for the climb. The platform hangs off the saddle on its own strap, already set in the right spot, so it isn't swinging around or catching on things while you're hanging sticks. It's just there. It doesn't get in the way and it doesn't put much stress, if any, on the saddle while you're climbing.
When you attach it to the tree, fold it down into position, and lock it in with the folding spike, you can really feel the platform set into the tree. It's solid and sturdy.
There's also no post on it. On a lot of platforms there's a vertical post running from the standing surface up to where the platform straps to the tree, and that post is what carries your weight when you step out on it. The Kunai does that job with the folding spike instead. The spike bites into the trunk and takes the load, so nothing has to run up through the middle of the platform. That leaves the whole standing surface open, and your feet and knees can rest against the tree when you want them to.

One Thing That Changed After I Ordered
My platform shipped with a rope attachment. Timber Ninja has since moved to a cam buckle strap on current platforms, so I swapped mine over.
The cam buckle is just easier to use. You feed the webbing through, pull it tight, and it locks. The part I like is that once it's strapped on, adjusting it is simple. Pull it too tight and you can back it off without starting over. If you're ordering now, yours comes with the buckle already.

The Add-Ons, and Why They're There
The five above get you in a tree. These are the pieces I added on top of them.
The add-ons
- ▸Ridge side pouches, Timber Ninja
- ▸Knee pads, GRITR
- ▸Three-step aider
- ▸Bow hanger, on the way
Ridge Side Pouches
I run a ridge side pouch on each side of the saddle, and I don't keep anything in them but rope. One pouch per rope. That's the whole system.
My lineman's rope lives on the left. It stays permanently attached to that side of the saddle. On the way up it's doing its job around the trunk. Once I'm at height and tethered in, I disconnect the free side and stuff the slack into the left pouch. It's still attached to me, it's out of the way, and it's not hanging off my hip catching on everything.
The right pouch carries my tether on the climb. When I get to platform height, that's the rope that comes out and goes up on the tree above me. That's what's holding me once I'm up there.
So there's a swap that happens at the top. Tether comes out of the right, lineman's slack goes into the left. Same move, same pouch, every single time. That's the same idea as picking a color for each rope and never changing it. The less you have to think about where something is, the more you can think about hunting.
The less you have to think about where something is, the more you can think about hunting.

Knee Pads
The knee pads aren't a Timber Ninja product, mine are GRITR. Your knees don't end up on the tree from leaning. It happens when you take a break from standing, sit down, and rest your feet. The saddle pulls you in toward the trunk and your knees come to rest against the bark. Sit like that for a while in the cold and you'll feel it. I bought them on the theory that it's easier to prevent a sore spot than to sit through one for four hours.
I finally wore them for the first time today. They're light, they go on fast, and the clips snap shut and stay tight instead of working loose the way cheap straps do. Comfortable the whole time I had them on. I'll know more after a long sit, but nothing about them made me want to take them off, which is about all you can ask from a piece of gear you're supposed to forget you're wearing.

Three-Step Aider
The last thing I added was a three-step aider. It's a short webbing ladder that hangs off the bottom of a climbing stick, so instead of stepping straight up onto that stick, you've got three more steps below it. That lets you hang the first stick higher than you could otherwise reach.
Mine is made in the USA out of tubular webbing, with a chafe guard where it rides against the stick and a keeper band up top. The rungs are black against the olive webbing and each one has a stiffener sewn in, so the step holds its shape instead of folding flat under your boot.

Some guys use an aider to carry fewer sticks. That's not why I bought mine. I run it on the first stick only, to get a higher starting point. That first stick sets the ceiling for everything above it, so hanging it higher means topping out higher with the same four sticks.
It's a tool that rewards knowing what you're doing, which is why it wasn't in my first order. I've used it practicing, not on a hunt yet.
I've also got a bow hanger on the way, and I'll get into that once I've actually used it. Gear hooks, dump pouches, accessory bags, all of it does something real. I'd just say get in a tree a few times first, figure out what you're actually reaching for, and buy toward that instead of guessing.
I'd just say get in a tree a few times first, figure out what you're actually reaching for, and buy toward that instead of guessing.
What I'd Tell Somebody Starting Out
A saddle, a tether, a lineman's rope, climbing sticks, and a platform.
That's the system. The reason it took me months to figure that out isn't that it's complicated. It's that almost nobody explains it that way. There are plenty of companies selling complete kits, and the kit page lists what's in the box, but it doesn't tell you what any of it does. You end up clicking into every product page one at a time, and half the time that doesn't help either.
Buy the five pieces that get you in a tree. Start practicing with those. Then build on that base once you know what you're actually missing.
What Comes Next
Knowing what the pieces do and knowing how to use them are two very different things. Next up is getting everything set up out of the box, and then the first setup on the tree.
The Saddle Series
One hunter going from tree stands to a saddle, documented as it happens.
- What made me start saddle huntingRead
- Choosing my setup and why I picked itRead
- What you actually need to start saddle huntingYou are here
- Out of the box and the first setup on the treeNext